
Your shopping cart is currently empty.
Swift Microscope Parts
Historians credit the invention of the compound microscope to the Dutch spectacle maker, Zacharias Janssen, around the year 1590 (more history here). The compound microscope uses lenses and light to enlarge the image and is also called an optical or light microscope (versus an electron microscope). The simplest optical microscope is the magnifying glass and is good to about ten times (10x) magnification.
The compound microscope has two systems of lenses for greater magnification
1. Ocular eyepiece lens to look through.
2. Objective lens, closest to the object. Before purchasing or using a microscope, it is important to know the functions of each part. This information is presented below. Links will take you to additional information and images.

The Functions of a Microscope
Eyepiece Lens: This is the microscope lens at the top that you look through, on compound microscopes it us usually 10x, and occasionally 15x power.
Eye Tube: The microscope eye tube connects the eyepiece to the objective lenses.
Revolving Nosepiece or Turret: This is the part of the microscope that holds objective lenses and can be rotated to change magnification.
Stage with Mechanical Stage: The flat platform where slides are placed under the microscope is called the microscope stage. A microscope will either include stage clips to secure the microscope slide, or it will include a mechanical stage. The mechanical stage also holds the slide, but it can be maneuvered with knobs to move the slide slightly forward/backward or left/right. A mechanical stage gives the user much more control over using the microscope.
Condenser: The purpose of the condenser lens is to focus the light onto the specimen. Microscope condenser lenses are most useful at 400x and higher magnification. If your microscope goes up to 1000x magnification, it should be fitted with a condenser lens that has a numerical aperture (NA) of 1.25 or greater. Condensers often have an iris diaphragm that can be opened and closed to allow different amounts of light through.
Diaphragm or Iris: Many microscopes have a rotating disk under the stage instead of a condenser. This diaphragm has different sized holes and is used to vary the intensity and size of the cone of light that is projected upward into the slide. There is no set rule regarding which setting to use for a particular power. Rather, the setting is a function of the transparency of the specimen, the degree of contrast you desire and the particular objective lens in use.
Illuminator: The microscope illuminator shines light up through the specimen. Most microscope illuminators are tungsten, halogen, fluorescent or LED. Halogen and tungsten illuminators heat up and can harm living samples, whereas LED and fluorescent illuminators provide a cool light. Some microscopes utilize a mirror for illumination and have no light. When using a stereo microscope an external illuminator is sometimes used.
Base: The bottom of the microscope, used for support. It is always best to keep the microscope on a flat and sturdy surface.
Rheostat: The illumination rheostat control allows you to change the intensity of the light that shines through the sample.
How to Focus Your Microscope: The proper way to focus a microscope is to start with the lowest power objective lens first and while looking from the side, crank the lens down as close to the specimen as possible without touching it. Now, look through the eyepiece lens and focus upward only until the image is sharp. If you can't get it in focus, repeat the process again. Once the image is sharp with the low power lens, you should be able to simply click in the next power lens and do minor adjustments with the focus knob. If your microscope has a fine focus adjustment, turning it a bit should be all that's necessary. Continue with subsequent objective lenses and fine focus each time.
Fine Focus: This is the focus knob that will allow you to fine-tune a focused image. Use this focus knob after using the coarse focus.
Coarse Focus: This is the first knob you should adjust when bringing your sample into focus. Once you have the image mostly in focus using the coarse focus knob, then use the fine focus knob to fine-tune your image.
Arm: Supports the tube and connects it to the base. Microscopes are typically carried by placing a hand under the base and the other holding the microscope arm.
Objective Lenses: Usually you will find 3 or 4 objective lenses on a compound microscope. They almost always consist of 4x, 10x, 40x and 100x magnification. When coupled with a 10x (most common) eyepiece lens, total magnification is 40x (4x times 10x), 100x , 400x and 1000x. To have good resolution at 1000x, you will need a relatively sophisticated microscope with an Abbe condenser. An Abbe condenser is composed of two lenses that control the light that passes through the specimen before entering the objective lens. The shortest lens is the lowest power, the longest one is the lens with the greatest power. Lenses are color coded and if built to DIN standards are interchangeable between microscopes. "DIN" is an abbreviation of "Deutsche Industrial Normen". This is a German standard that has been adopted internationally as an optical standard used in most quality microscopes. A typical DIN standard microscope objective lens has a 0.7965" (20.1mm) diameter threads, 36 TPI (threads per inch), and a 55º Whitworth. Many high power objective lenses are retractable (i.e. 40XR). This means that if they hit a slide, the end of the lens will push in (spring loaded) thereby protecting the lens and the slide. All good quality microscopes have achromatic, parcentered, parfocal lenses. On a stereo microscope the objective lens is built into the microscope and can not be changed. In order to alter magnification on a stereo microscope an auxiliary lens is attached to the stereo microscope.
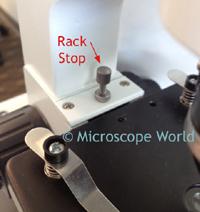 Rack Stop: This is an adjustment that determines how close the objective lens can get to the slide. It is set at the factory and keeps students from cranking the high power objective lens down into the slide and breaking things. You would only need to adjust this if you were using very thin slides and you weren't able to focus on the specimen at high power. (Tip: If you are using thin slides and can't focus, rather than adjust the rack stop, place a clear glass slide under the original slide to raise it a bit higher).
Trinocular Port: The microscope trinocular port is made for mounting a microscope camera. In order to mount the camera you will need to use the microscope c-mount adapter. Microscope c-mount adapters are brand specific, so if you have a Swift microscope, you will need to use the corresponding Swift c-mount adapter. It is also possible to mount a tablet camera on the microscope so that your viewing screen sits on top of the microscope.
This page has activities and free printouts for labeling parts of the microscope.
Related Articles:
Infographic on the History of the Microscope